I migrated this blog to a new system. I am now hosted by Netlify.
The new address for this blog is https://blog.vda.io.
I migrated this blog to a new system. I am now hosted by Netlify.
The new address for this blog is https://blog.vda.io.
For some time now, people I know have been asking me for some mentoring on the basics of Python. Most of them were somewhat familiar with basic programming but were definitely not in the IT field and were not coding for a living. They were all interested in using Python to script away some of the boring and/or tedious tasks they faced at work.
To assist them with that, I wrote a small series of tutorials on how to use the awesome package ecosystem for Python in order to accomplish things that would help them with their daily work. I am sure some ‘actual’ developers would scoff at the simplicity of the tasks at hand but it strikes me as one of these small-changes / big-impact situation. Even very little automated tasks can improve considerably the daily work and productivity of these people.
In order to help a wider audience automate their own workflows, I decided to post a series of articles based on the tutorials I designed.
The subjects I want to cover are very ‘business’ and productivity oriented and are designed to provide an example on how to do specific tasks with Python. These tasks will include the following subjects:
This series of article is **NOT** designed as an introduction to Python and you will need to know some Python to begin with. I will also **NOT** cover how to install Python and get it running on your favorite operating system. If you are interested in either of these subjects before starting my articles, I gathered some links down below in the ‘Setting up’ section that will guide you through the basics.
In this section, I will provide you with a few links to help you setup your workspace and get started with Python. However, since it is not in the scope of this series of articles, I will not dwell on it. The official page for Python for Beginners is a good start : https://www.python.org/about/gettingstarted/.
One of the best recent tutorials on how to install Python on your favorite operating system has been published by Django Girls as a part of their tutorial on Django (a web framework for Python. You can find it here: https://tutorial.djangogirls.org/en/python_installation/.
Even though you can code with the standard windows notepad, it is much more comfortable to be using a dedicated editor with at least some syntax highlighting.
I have a personal preference for Sublime Text, it works on OSX, Linux and Windows, it can be downloaded for free but if you like it, I would strongly recommend supporting the developer and buying a license. You can download it here: https://www.sublimetext.com/3.
There are a lot of way to learn Python from scratch out there. You have traditional books, tutorials, videos, MOOCs, podcasts, pretty much anything you can imagine. The python guide has a webpage detailing some of the options at this URL: http://docs.python-guide.org/en/latest/intro/learning/.
A fairly good interactive tutorial (you can test your code directly in your web browser) is available at this URL: https://www.learnpython.org/.
Sometimes, you need to run a script « forever »: it needs to run even after reboot and needs to be restarted if it is killed.
There is many solutions for that, one of the best being the very well named forever. However, I wanted to do that in the most portable (a.k.a. which could run with minimal modification on any unix/linux system).
My solution is to generate a pid file and periodically check on it with cron. It is probably not the best solution but at least it uses only very widespread standard utilities and do not need any untrusted third-party scripts.
This is the boilerplate script (my_forever_script.sh), you just need to replace « #– YOUR ACTUAL SCRIPT » by your actual script 🙂 :
https://gist.github.com/elentarion/7320722
Then, you need to add your script to your crontab and run for example every five minutes. This will make sure that the maximum downtime for your script will be five minutes :
*/5 * * * * cd /home/MYUSER && ./my_forever_script.sh
If you want to test this script, you can start by replacing the line « #– YOUR ACTUAL SCRIPT » by something like:
echo "Hello World!"
sleep 42
This should be the output if you try starting the script multiple times (in the 42 seconds window):
# ./my_forever_script.sh &
No PID File.
Hello World!

# ./my_forever_script.sh &
Found PID 1337
my_forever_script.sh is already running.
If you are using it for critical tasks (monitoring, backup, logging, etc, …), be sure to test it thoroughly before deploying it into production.
NFS (Network File System) is a very efficient way to share files on a local network. It is basically the Linux version of Samba.
In this example, we will have the following network topology :
We first need to install the NFS server package. it comes in two version : kernel or user. The kernel version is faster but not as easy to debug as the user version. We will use the kernel version :
# Installation of the NFS kernel server
apt-get install nfs-kernel-server
At the end of the installation, you should see the line below. It means that the NFS server as not been started because there is nothing to share. This is our next step.
...
[warn] Not starting NFS kernel daemon: no exports. ... (warning).
Now, we need to create our shared directory. Then, we will need to declare it in the NFS server export list (file /etc/exports).
# Creation of the shared folder
mkdir /srv/nfs_shared_folder
# Edit the /etc/exports file
nano /etc/exports
In the exports file, we need to add the following line :
/srv/nfs_shared_folder 192.168.0.0/24(rw,root_squash)
With this configuration, we are sharing the folder /srv/nfs_shared_folder with the entire local network. Review of the options in the parentheses :
To enable this new configuration, we need to restart the NFS server :
/etc/init.d/nfs-kernel-server restart
We are done with the server configuration !
With a linux client, setting up NFS is really easy, you need to install the package ‘nfs-common’ and then you can mount NFS like any other filesystem :
# Installation of the nfs-common package
apt-get install nfs-common
# Creation of the mount point
mkdir /home/yourusernamehere/nfs_mount_point
# Mounting the NFS folder to a local mount point
mount -t nfs 192.168.0.100:/srv/nfs_shared_folder /home/vdagonneau/nfs_mount_point
It is done ! Your NFS volume is now mounted on /home/yourusernamehere/nfs_mount_point.
In this post I will explain how to deploy a traffic shaper based on OpenBSD using PF.
The original problem was simple : a dedicated 100Mbps link had to be divided amongst several departments. Each department needed a guaranteed part of the total bandwidth and a public IP.
For example, for this article :
To fulfill the needs of all the departments we need 6 + 1 IPs (6 for the different departments and 1 for our shaper). Our ISP provided us with an additional block of 14 public IPs : 33.33.33.32/28 and a free block of 2 public IP addresses : 55.55.55.52/30.
| Department | IP |
|---|---|
| Human resources | 33.33.33.34 |
| Logistic | 33.33.33.35 & 33.33.33.36 |
| Security | 33.33.33.37 & 33.33.33.38 |
| Other | 33.33.33.39 |
Our OpenBSD gateway will have the IP 33.33.33.33, the netmask is 255.255.255.240, the broadcast address is 33.33.33.47 and the network address is 33.33.33.32. We still have 7 available public addresses (40-46).
Here is a small network diagram summarizing everything :
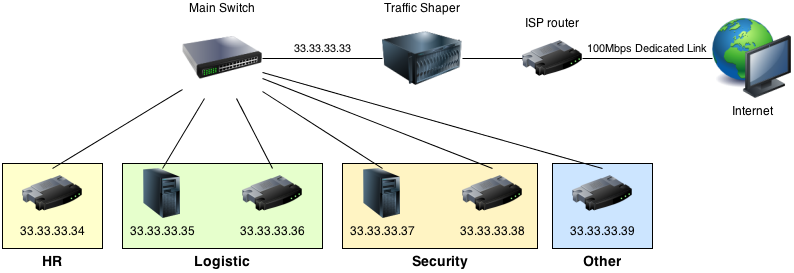
We need to have two network interfaces on our Traffic Shaper. One will be on the 33.33.33.32 network and the other will have the address provided by your ISP. The goal is to create a bridge between this two interfaces and then filter packets over this bridge with PacketFilter. Each department equipment will need to be connected to the main switch and configured with the following network configuration :
IP : 33.33.33.xx
Netmask : 255.255.255.240
Gateway : 33.33.33.33
This way, every packets will be forwarded to our Traffic Shaper on the internal interface (33.33.33.33) before going through the bridge (and PacketFilter) to the internet.
To configure our OpenBSD gateway for traffic shaping we need two main steps : building a transparent bridge and then configure our PacketFilter to do some filtering over this bridge.
To build a network bridge we first need to configure the two ends : internal (33.33.33.32 network) and external (55.55.55.53).
We will assume that em0 will be our external interface. To configure it, we need to edit the file /etc/hostname.em0 :
inet 55.55.55.53 255.255.255.252
up
We will assume that em1 will be our internal interface. To configure it, we need to edit the file /etc/hostname.em1 :
inet 33.33.33.33 255.255.255.240
up
Now that we have our 2 interfaces, we will have to create a seamless bridge between them. We need to edit the file /etc/hostname.br0 :
add em0
add em1
up
We also need to enable the kernel IP forwarding ability in « /etc/sysctl.conf » : you need to find the line « net.inet.ip.forwarding=0 » and change it to « net.inet.ip.forwarding=1 ». You will have to reboot.
And that’s it ! Now, you only have to connect your em0 interface to your ISP router and your em1 interface to your main switch and the connected equipments with the good configuration should be able to access the internet.
We now have to configure PacketFilter to enforce traffic shaping.
Before starting configuring PacketFilter, we must first design the bandwidth sharing policy. In this case, I decided to use a « borrow » policy to maximize the use of the total bandwidth. Basically, the limits we decided in the first place are lower limits : we guarantee that it will not fall under but we allow each department to « borrow » bandwidth from others IF it is not in use.
All the configuration for PacketFilter is done in /etc/pf.conf. The first thing to do is to define some useful aliases :
# Defining interfaces aliases
external_interface="em0"
internal_interface="em1"
bridge="br0"

# Defining allocated IP addresses for departments
HR_IP="33.33.33.34"
Logistic_IP1="33.33.33.35"
Logistic_IP2="33.33.33.36"
Security_IP1="33.33.33.37"
Security_IP2="33.33.33.38"
Other_IP="33.33.33.39"
We also need to set some options : returning a failed delivery message for unknown packets (option block-policy) and skipping all filtering on the loopback interface.
# Setting global options
set block-policy return
set skip on lo0
Next, we have to enable altq (ALTernate Queueing) on our two interfaces (for inbound and outbound traffic). We use the CBQ (Class Based Queueing) algorithm to create queue classes and enable bandwidth borrowing. We also define the names of the child queues.
# Enabling altq on internal & external interface
altq on $external_interface cbq bandwidth 100Mb queue { \
	HR_Queue_outbound, 			\
	Logistic_Queue1_outbound, 	\
	Logistic_Queue2_outbound, 	\
	Security_Queue1_outbound 	\
	Security_Queue2_outbound 	\
	Other_Queue_outbound 		\
}
altq on $internal_interface cbq bandwidth 100Mb queue { \
	HR_Queue_inbound, 			\
	Logistic_Queue1_inbound, 	\
	Logistic_Queue2_inbound, 	\
	Security_Queue1_inbound 	\
	Security_Queue2_inbound 	\
	Other_Queue_inbound 		\
}
Now, we need to define each queue both for inbound and outbound traffic. We activate the « RED » (Random Early Detection) option in order to avoid network congestion.
# Defining bandwidth limit for each outbound queues
queue HR_Queue_outbound bandwidth 10Mb cbq (borrow, red)
queue Logistic_Queue1_outbound bandwidth 5Mb cbq (borrow, red)
queue Logistic_Queue2_outbound bandwidth 5Mb cbq (borrow, red)
queue Security_Queue1_outbound bandwidth 10Mb cbq (borrow, red)
queue Security_Queue2_outbound bandwidth 10Mb cbq (borrow, red)
queue Other_Queue_outbound bandwidth 60Mb cbq (default, borrow, red)

# Defining bandwidth limit for each inbound queues
queue HR_Queue_inbound bandwidth 10Mb cbq (borrow, red)
queue Logistic_Queue1_inbound bandwidth 5Mb cbq (borrow, red)
queue Logistic_Queue2_inbound bandwidth 5Mb cbq (borrow, red)
queue Security_Queue1_inbound bandwidth 10Mb cbq (borrow, red)
queue Security_Queue2_inbound bandwidth 10Mb cbq (borrow, red)
queue Other_Queue_inbound bandwidth 60Mb cbq (default, borrow, red)
The last thing we need to do is to assign traffic to the queues we just defined :
# Assigning traffic to inbound queues
pass in quick on $bridge to $HR_IP queue HR_Queue_inbound
pass in quick on $bridge to $Logistic_IP1 queue Logistic_Queue1_inbound
pass in quick on $bridge to $Logistic_IP2 queue Logistic_Queue2_inbound
pass in quick on $bridge to $Security_IP1 queue Security_Queue1_inbound
pass in quick on $bridge to $Security_IP2 queue Security_Queue2_inbound
pass in quick on $bridge to $Other_IP queue Other_Queue_inbound

# Assigning traffic to outbound queues
pass out quick on $bridge to $HR_IP queue HR_Queue_outbound
pass out quick on $bridge to $Logistic_IP1 queue Logistic_Queue1_outbound
pass out quick on $bridge to $Logistic_IP2 queue Logistic_Queue2_outbound
pass out quick on $bridge to $Security_IP1 queue Security_Queue1_outbound
pass out quick on $bridge to $Security_IP2 queue Security_Queue2_outbound
pass out quick on $bridge to $Other_IP queue Other_Queue_outbound
This was the last thing to do, now your traffic shaper is fully configured. We still need to load the rules and activate Packet Filter :
# Loading the rule file
pfctl -f /etc/pf.conf
# Enabling Packet Filter
pfctl -e
# Disabling PacketFilter
pfctl -d
The rule file « pf.conf » will automatically be read at boot time.
